Broker pattern

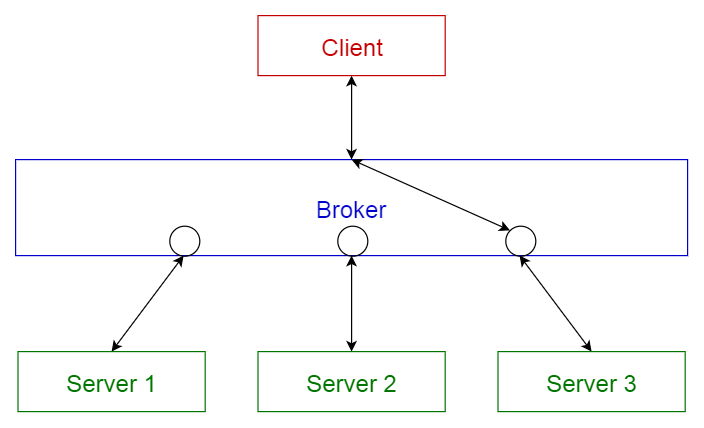
This pattern is used to structure distributed systems with decoupled components. These components can interact with each other by remote service invocations. A broker component is responsible for the coordination of communication among components.

Servers publish their capabilities (services and characteristics) to a broker. Clients request a service from the broker, and the broker then redirects the client to a suitable service from its registry.

Usage
Message broker software such as Apache ActiveMQ, Apache Kafka, RabbitMQ, Websphere MQ and JBoss Messaging.

Pipe-filter pattern

This pattern can be used to structure systems which produce and process a stream of data. Each processing step is enclosed within a filter component. Data to be processed is passed through pipes. These pipes can be used for buffering or for synchronization purposes.

Usage
Compilers. The consecutive filters perform lexical analysis, parsing, semantic analysis, and code generation.
Workflows in bioinformatics.

Master-slave pattern

This pattern consists of two parties; master and slaves. The master component distributes the work among identical slave components, and computes a final result from the results which the slaves return.

Usage
In database replication, the master database is regarded as the authoritative source, and the slave databases are synchronized to it.
Peripherals connected to a bus in a computer system (master and slave drives).

Client-server pattern

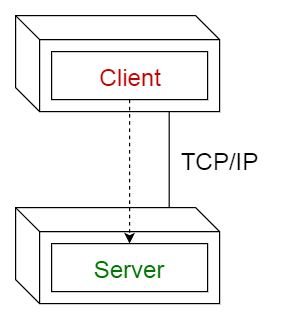
This pattern consists of two parties; a server and multiple clients. The server component will provide services to multiple client components. Clients request services from the server and the server provides relevant services to those clients. Furthermore, the server continues to listen to client requests.

Usage
Online applications such as email, document sharing and banking.

Layered pattern

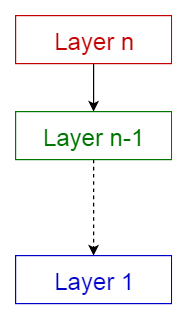
This pattern can be used to structure programs that can be decomposed into groups of subtasks, each of which is at a particular level of abstraction. Each layer provides services to the next higher layer.

The most commonly found 4 layers of a general information system are as follows.

Presentation layer (also known as UI layer)
Application layer (also known as service layer)
Business logic layer (also known as domain layer)
Data access layer (also known as persistence layer)

Usage
General desktop applications.
E commerce web applications.

Python and requirements.txt

Why requirements.txt?

Any application typically has a set of dependencies that are required for that application to work. The requirements file is a way to specify and install specific set of package dependencies at once.

Format for requirements file:

requests==1.2.0
Flask==0.10.1

Method 1:

$ pip freeze > requirements.txt

Use pip’s freeze command to generate a requirements.txt file for your project: If you save this in requirements.txt, then you can pip install -r requirements.txt.

Method 2:

Use pipreqs – pipreqs used to generate requirements.txt file for any project based on imports

Why not pip freeze ?
pip freeze saves all packages in the environment including those that you don’t use in your current project. (if you don’t have virtualenv)
pip freeze only saves the packages that are installed with pip install in your environment.
sometimes you just need to create requirements.txt for a new project without installing modules.

How to use?

$ pip install pipreqs

$ pipreqs /path/to/project

for additional options see https://github.com/bndr/pipreqs


Google Code Prettify and WordPress plugin

Google Code Prettify enable syntax highlight to source code in HTML page. In WordPress you can use Simple Code Highlighter plugin.

To use the Google Code Prettify plugin, place your code within a <pre> text block, and then specify the class of the block as “prettyprint”.  To do this, switch to Text mode within the WordPress editor.

You can use pre tag and class=”prettyprint” attribute to your code

// your code here

Here are some examples:

Default

Many
lines
of
code

Default with line numbers

Many
lines
of
code

Java

class HelloWorldApp {
    public static void main(String[] args) {
        System.out.println("Hello World!"); // Prints the string to the console.
    }
}

Python

class SchoolMember:
    '''Represents any school member.'''
    def __init__(self, name, age):
        self.name = name
        self.age = age
        print('(Initialized SchoolMember: {})'.format(self.name))

    def tell(self):
        '''Tell my details.'''
        print('Name:"{}" Age:"{}"'.format(self.name, self.age), end=" ")


class Teacher(SchoolMember):
    '''Represents a teacher.'''
    def __init__(self, name, age, salary):
        SchoolMember.__init__(self, name, age)
        self.salary = salary
        print('(Initialized Teacher: {})'.format(self.name))

    def tell(self):
        SchoolMember.tell(self)
        print('Salary: "{:d}"'.format(self.salary))


class Student(SchoolMember):
    '''Represents a student.'''
    def __init__(self, name, age, marks):
        SchoolMember.__init__(self, name, age)
        self.marks = marks
        print('(Initialized Student: {})'.format(self.name))

    def tell(self):
        SchoolMember.tell(self)
        print('Marks: "{:d}"'.format(self.marks))

t = Teacher('Mrs. Shrividya', 40, 30000)
s = Student('Swaroop', 25, 75)

# prints a blank line
print()

members = [t, s]
for member in members:
    # Works for both Teachers and Students
    member.tell()

Node.js

var http = require('http');

http.createServer(function (req, res) {
    res.writeHead(200, {'Content-Type': 'text/plain'});
    res.end('Hello World!');
}).listen(8080);

Git and Github with 3 simple rules

Before I go ahead and discuss the three simple rules for mastering Git and Github, please consider completing the following tasks:
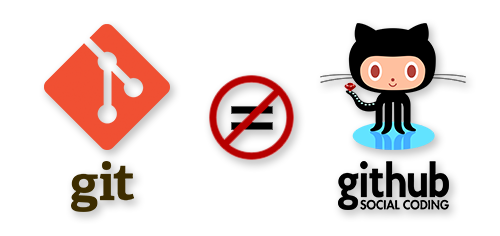
And now, without much further ado, the three simple rules to master Git and Github while learning how to code…

  • Rule #1: Create a Git repository for every new project
  • Rule #2: Create a new branch for every new feature
  • Rule #3: Use Pull Requests to merge code to Master

Even if you are working on small and simple projects, and even if you are working alone, following those three rules every time you code will make you a Git and GitHub master user very quickly.

Rule #1: Create a Git repository for every new project
This first rule is quite straightforward, but making a habit out of it is very important. Every time you start working on something new — your portfolio, a learning project, a solution to a coding challenge, and so on — you should create a new Git repository and push it to GitHub.

Having a dedicated repo is the first step to being able to use version control for every line of code you write. Using version control is how you will work once you join a company and start working on real-world projects. Learn this early and make it a habit.

Quick Note: if using the terminal becomes a hassle and makes you less likely to use Git for all your projects, consider using the Github Desktop app.

Rule #2: Create a new branch for every new feature
Let’s say you are working on your portfolio and you want to build a new “Contact me” section/component. Create a dedicated branch for this new feature, give it a meaningful name (e.g. contact-me-section), and commit all the code to that specific branch.
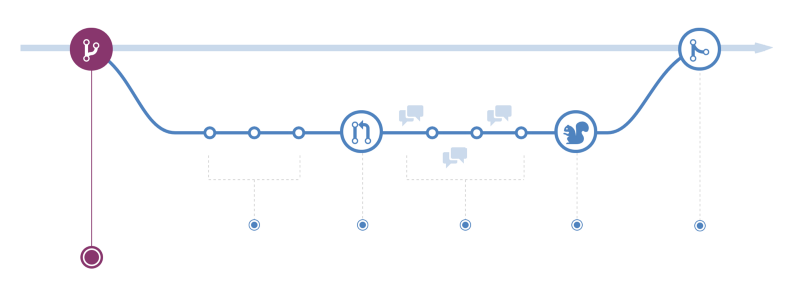
If you don’t know what branches are, go back to the Github Flow reading that I recommended before.

Working with branches allows you and your team members to work on different features in a parallel way while keeping the specific code for each feature isolated from the rest. This makes it harder for unstable code to get merged into the main code base.

Even if you are the only person on your team, getting used to using feature branches will make the Github Flow process a breeze once you join a real job.

Rule #3: Use Pull Requests to merge code to Master
Every repository starts with a master branch by default. You should never push changes directly to the master branch. Instead, you should use feature branches as described above, and open a new Pull Request to merge the feature branch code with the master branch code.

In a real job, someone will look at your Pull Request and do a code review before approving it. GitHub will even run automated tests to your code and let you know if there is an issue with it. You will also be notified if there is any merge conflict between your code and the code in the master branch. This can happen, for example, if another developer pushed a change to the master branch that affects a file that you also modified.

After your code has been reviewed, tested, and approved, your reviewer will give you thumbs up for you to merge the Pull Request, or they will directly merge your pull request.
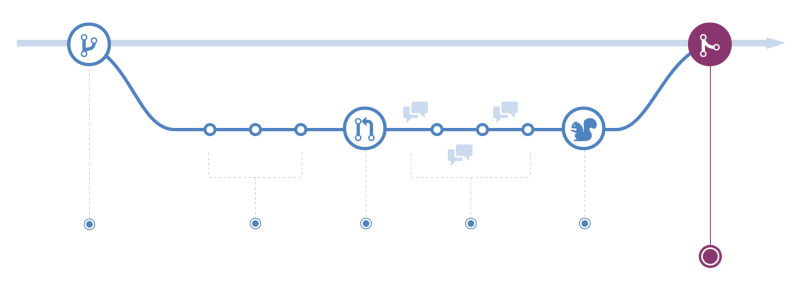
Even if you are working alone, get used to creating Pull Requests as a way to merge your changes to the master branch. This, by the way, is the basic workflow used by almost every open source project. If you ever contribute to one (you should!), understanding this three rules will make it really easy for you to get your contribution accepted without any problem.

If you are still confused, just start slow and keep the three rules in mind. Don’t try to think about “How” to do things yet and focus on “What” to do and “Why” it’s important for now.

Once the “What” and the “Why” are clear, you can figure out the “How” when the times comes to do things. Once you have repeated this process 2–3 times, it will become really easy and natural for you.
Managing Multiple Java Versions on Mac

Apple announced to remove Java Preferences app from Mac OS X http://support.apple.com/kb/HT5493. Let’s try to fix it. Generally, java applications will use the JAVA_HOME environment variable to pick a JDK.

To set to JDK 6

export JAVA_HOME=$(/usr/libexec/java_home -v 1.6)

To set JDK 7

export JAVA_HOME=$(/usr/libexec/java_home -v 1.7)

To set JDK 8

export JAVA_HOME=$(/usr/libexec/java_home -v 1.8)

Created aliases for my zsh

alias setjdk16='export JAVA_HOME=$(/usr/libexec/java_home -v 1.6)'
alias setjdk17='export JAVA_HOME=$(/usr/libexec/java_home -v 1.7)'
alias setjdk18='export JAVA_HOME=$(/usr/libexec/java_home -v 1.8)'

You can also read Managing Multiple Java Versions on Mac using Jenv

Gerenciando múltiplas versões Java no Mac

A partir da versão 7, a Apple parou de gerenciar o JDK para Mac OS. Essa responsabilidade agora é da Oracle. Até a JDK 6, a Apple trazia como default o Java instalado, acredito que além de uma questão política das empresas, deve ter relação com o fato que de tempos em tempos sempre é publicado uma vunerabilidade da JVM em sites de segurança.

Porém, como desenvolvedor, pode ser necessário você trabalhar com várias versões de JDK e ai que entra a parte interessante da dica.

Na pasta ” /Library/Java/” do Mac OS estão todas as instalações do Java da sua máquina. Lá existem três pastas (Extensions, Home e JavaVirtualMachines). Na pasta JavaVirtualMachines é possível checar todas jdk instaladas, pois é salvo um arquivo, como “jdk1.7.0_21.jdk”.

Caso esteja testando o Jdk 8, e precise manter o 6 e o 7 configurado, é possível dinamicamente setar o JAVA_HOME, através de um simples comando, configurado no arquivo .bash_profile.

O arquivo bash_profile fica no caminho ~/.bash_profile e pode ser editado com qualquer editor do terminal, como vi, por exemplo.

Com o editor aberto, adicione as seguintes linhas ao arquivo:

export JAVA_HOME=$(/usr/libexec/java_home -v 1.6)

export JAVA_HOME=$(/usr/libexec/java_home -v 1.7)

export JAVA_HOME=$(/usr/libexec/java_home -v 1.8)

E para definir o comando que seta a JAVA_HOME atual, crie as três linhas abaixo:

alias setjdk16=’export JAVA_HOME=$(/usr/libexec/java_home -v 1.6)’

alias setjdk17=’export JAVA_HOME=$(/usr/libexec/java_home -v 1.7)’

alias setjdk18=’export JAVA_HOME=$(/usr/libexec/java_home -v 1.8)’

Para definir qual jdk é a default, basta chamar o comando do alias.

Exemplo para setar JDK 6, executar setjdk16 e testar com javac -version ou java-version. O mesmo para as outras versões.